Monday, April 30, 2012

Portly Pig cutting board

Here is a quick project I whipped together today!

I got this old cutting board in a box of free stuff sitting at the curb. I knew I wanted to do something with it. I came across this image of 2 cute fat pigs from the graphics fairy .
I typed up the Bon Appetit in Microsoft Word using the font "Blackadder ITC"


It was pretty dirty and gross, I didnt take a picture before I cleaned it up, so just use your imagination.


Here it is cleaned up.


I modified the image in Paint, by erasing all the extra stuff to save ink.(im on my last few drops)
I used the pencil transfer method like I used here.
Taped it in place and traced over the image.
Then did the same with the letters. Then filled it in with a sharpie!

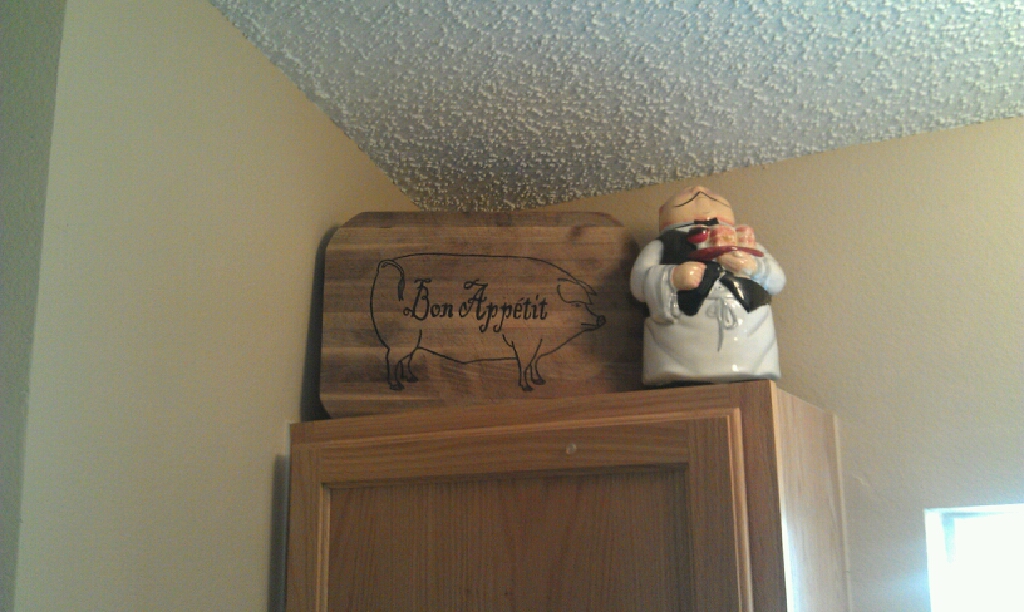
Now it sits above my cabinets in the kitchen along with my portly french chef! :-)
Ahhh... another great item saved from the trash!

Shipping crate storage bench!

I needed a place to store our dvd collection! I didnt like the open shelves we had before, I wanted to make a storage bench that looked like an old shipping crate. Of course I took apart a pallet :-)


I started by building a simple box,
Start with the sides,

Then attach the front and back, then I built the top
Used some hindges to secure the top to the base. I didnt build a bottom because it really didnt need one since I was just putting it on the floor.

Now I got all those awesome images, including the key on the pillow, from the graphicsfairy ! The front image here. She has an awesome collection of free vintage clip art!! Then I used this website to turn my image into a bigger one.

I was going to use carbon paper to transfer the image to the wood but I wasnt about to pay $16 for it!
So I turned the image over and colored really hard with a pencil.

It works just the same as carbon paper but for $0, assuming you have a pencil laying around.

Then I tapped it down where I wanted it and started tracin over the image. Be sure to press kinda hard to make sure the image transfers well.

As you can see here it works pretty good, it just takes some time coloring the back of the image with the pencil, if youd rather spend the $$ and get done faster, do that.


Then I just filled it in with a sharpie.


I love it! we just had a party and the bench came in handy for extra seating!

Im linking up to The Graphics Fairy today to brag about my work with her images :)

p.s. I updated with high quality pictures!


Saturday, April 28, 2012

Cute Fabric Flowers


These are so easy and cheap to make! Scrap fabric, buttons, needle and thread!


Ahhh :-)


These jars were kinda borring...


I took some burlap, carefully hot glued one end, and wrapped it around and glued the other end,


Now time for the fowers, pick out some scrap fabric, here I used an old t-shirt.
find a circle, keep in mind one petal will be 1/4 the size the circle, to trace around. I used 3 different sizes.


Trace 5 circles of each size, this makes 1 flower, and cut them out.

fold in half veritcially


Fold in half again.


hold the 2 folds facing you, sew along the cut edges. Start the first petal from under neath to hide the knot in the thread. Double the thread to make it stronger so it wont break when you pull it tight.


sew long stiches along the cut ends.


hold the thread, and scrunch down the fabric.
and repeat for each petal, being sure to start with the 2 folded ends facing you each time.
for the 2nd and rest of the petals, poke the needle from the top side down, this will keep the petals nice seemless looking when pulled tight together.


after you have all the petals on, thread the needle back through the first one, just enough to join them
Pull tight and tie off.


Then hot glue a button over the hole, it needs to be slightly bigger than the hole.
if you dont have buttons, you could cut out a circle from cardboard, and cover it with fabric.
Then glue the flower to whatever :-)


These are so cute! I had to make more :-)


bottles from my neighbors recycling, since we dont drink, but the bottles are so cute to decorate with!
Im sure ill be making a ton more of these!

Tuesday, April 24, 2012

Make a $3 Topiary

So I wanted a some what tall topiary for the corner of my dinning room, but you know me im cheap and didnt want to pay the stupid prices for them, like $30-50 !! So this is what i came up with for $3


you will need, newspaper, duck tape, dowel rod, brown, green & black paint, hot glue, rocks or something for weight in the pot, flower pot, box, and green spanish moss.

ok we all know how stupidly expensive the styrofoam balls are, like $10 for a big one! no way so this is how i made the balls.

crumple up sheets of newspaper, ball them all together, then wrap in duck tape keeping the ball shape, You can then roll it around with your palm to shape it more.

 Ta dah! it will be slightly lumpy but no big deal, the moss covers it up.


I made 3, You want the bottom biggest ball to be slightly smaller than the flower pot.
Then I spray painted them green, and painted the cardboard box black.
I also painted the dowel rod brown. After all was dry I drilled a hole through the center of the 2 bottom balls to fit the rod through. I drilled the top ball halfway through. Then positioned them on the rod a few inches apart. I glued the rod in the pot and held it while i filled it with sand a sea shells.

Then seperated the moss, and put some hot glue on the ball, then started sticking. Holding it a few seconds to dry, then repeat.
 I put a piece of newpaper over the pot to keep all the little pieces of moss that falls off from getting in with the shells. And after some time and a ton of hot glue and burns later set it on the box and...


It looks awesome in the corner of my dinning room :)

p.s. go to dollar tree :)


Thursday, April 19, 2012

Kitchen, dinning room sign

I LOVE this! I used a piece of wood from a pallet, Free Paint from Ace Hardware, sand paper, printed off letters, a pencil, and a small paint brush.

Its so easy, after printing off the words, turn the paper over and color hard over the letters with a pencil, this creates CHEAP carbon paper, I went to buy some at staples and it was like $16 no thanks!  Put the letters on the board and trace with a pen.

It shows up really good, dont even bother wasting money on carbon paper!
Next take the small paint brush, or a paint pen and fill in!
This coast me nothing but a few hours! :-)


I hung it in my dinning room above the doorway to the hallway!


Be inspired :-)

Tuesday, April 17, 2012

Craigslist Chandelier Make over

I know its been a while but ive been BUSY making over my house :-) lots of posts soon to come.
I wanted to share with you my awesome new dinning room light make over!


Ta Dah! I always like showing the finished product first!


This is what I had! OMG I hated it SOOOO MUCH! ugly!


I got this on Craigslist for $10 :-) i spent $2 on spray paint! I liked the nickle it was before, but it needed to be black to go with the rest of the dinning room!


Love it! its so much better than that ugly globe I had before! and switching out the light wasnt hard at all, which my husband did for me!

p.s. I painted the walls :-)